Nettailer contains an advanced content management section. This is where your custom documents can be created. For example Customer Services, Contact Us and About Us pages etc.
Once this link is clicked a new browser window will open. This window is divided into three sections.
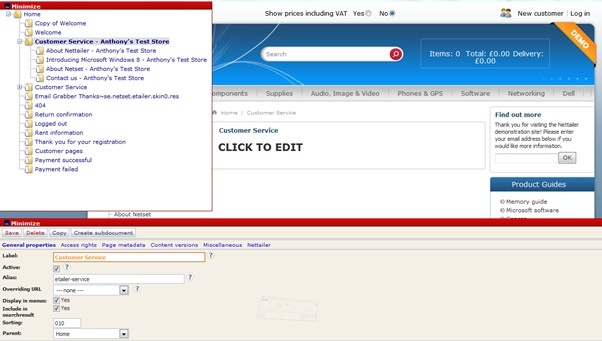
Top left is the navigation menu, where you can add or select an existing document to edit or view. To the right is the preview window, giving you a look at your changes as you go along. At the bottom is the editing section, showing all the settings for the currently selected part of the document you are working on.
Once you have created a document or selected an existing document in the navigation window, you may start to edit it by clicking on the element in the preview window and putting the information into the editing section (bottom window).
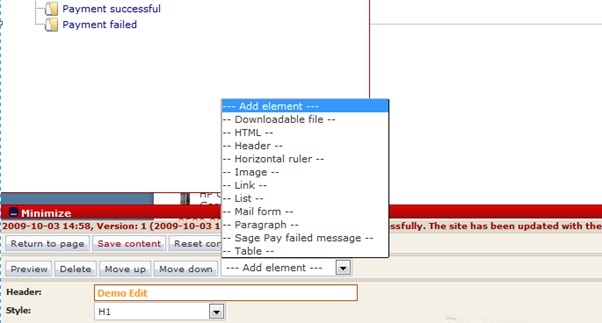
To add content to a page, you will need to decide which element of content you want to add from the "elements" drop down menu. You can add a picture, paragraph, section, heading, link, download file and more.Once you have selected the first element you are ready to add the content in the editing section.
Click the "Preview" if you want to check the results before then to save it. Click "Save content"
Warning
Please remember to press the "Save content" button once you have created pages or made any changes in the document section of Nettailer.
Customized pages
To create a customer or client specific welcome page, you create a new sub-document from the "Home" menu. This page needs to have an alias called "Etailer-customer pages". Tick the relevant box if you want the page to be viewed in the menus and Searchable. Once you have created a customer page under the customer pages – your store name tab you can then connect to customers or customer group so the page is shown when the customer logs in.
Start by clicking on the page you have created with alias "Etailer-customer pages". Next select the "Create the document." In the edit box that appears you can now fill in the "label" for the site, such as customer name. This name is for you to keep track of the pages you create. It is therefore not shown in the store. Then click "Save."
Then click on the title of the template "Public Documents". This creates the page and then click on the "click me" and enter a title in the "heading". For example, "Welcome to the customer name's Shop" The title size, click in the "style", where H1 is the largest and H6 is the smallest.
If you want to add a new element on a page, they do this most easily by clicking on an element in the preview image. You can now add new items via the "drop-down" menu called "Add element". Here you can easily choose whether you want to add a picture, paragraph, section, title, link, download file and more.
Adding elements
Each element contains a set of options:
Image
You can upload any file in jpg, png or gif format. You can specify the required measure. If you only specify a value for height or width so the image is scaled proportionally automatically. You can also specify the image to be linked to URL or an email.
HTML
With this element you can paste or insert html code in to the editor manually.
Horizontal line
This element creates a line that you might need to use to mark the division of paragraphs or sections of the page.
List
This element allows you to create bulleted or numbered lists. You can easily add lines and change the type.
Downloadable file
This element allows you to upload files to your customers to download, for example, a price list or invitation. You can choose whether the page should display a file type icon. This is done automatically and displays such as a PDF, Word or Excel icon depending on the type of file you uploaded.
Title
This element is used to generate headers. You can choose from six different styles for your headline.
Paragraph
This element is used to create paragraphs of text or main content. You can use this element normal, bold and italics.
Info
If you choose to copy text from your regular word processor and paste it in the shop, this is where you might do it. However any formatting done inside of a word processor will not been shown here.
Table
With this element, you can create simple tables. You can add and delete rows in the table by using the "+" - and "-" characters. You can specify whether you want the first row or column to be the headline / bold.
e-mail form
This element allows you to add the finished e-mail form you have created by Mail forms editor.
After saving the customer pages, you can link them to customers or customer groups. This is done at the customer or customer group card.<!-- /* Style Definitions */ table.MsoNormalTable
-->You can add