ADD-ON
Our Asset Inventory module helps your end-customer keep track of their IT equipment and other tools related to their organisation.
This add-on will help them simplify the overview of the hardware, the life-cycle management, and their ability to run operations and earn profit.
The end-user can track their assets, where they are, how much they cost, and more.
Setup
As Asset Inventory is an add-on with extra cost, you will need your sales representative to help you implement and set up the module.
Permissions
It´s possible to set different permissions for the customer group/customer/users and it will be set to one of the following:
- None - cannot view, create or update assets.
- Read - can only view assets.
- Update - can view, create and update assets.
There is a hierarchical permission precedence, see below. It goes from highest to lowest in precedence:
User > Customer > Customer group > Shop-settings
That is, permissions on the user will take precedence before the settings set on customer, customer group and shop-settings.
Shop default permission is changed under the Settings -> Miscellaneous.
After you set the permissions the user can access Asset Inventory through “Your account” in the front-end.
How to create assets
From order
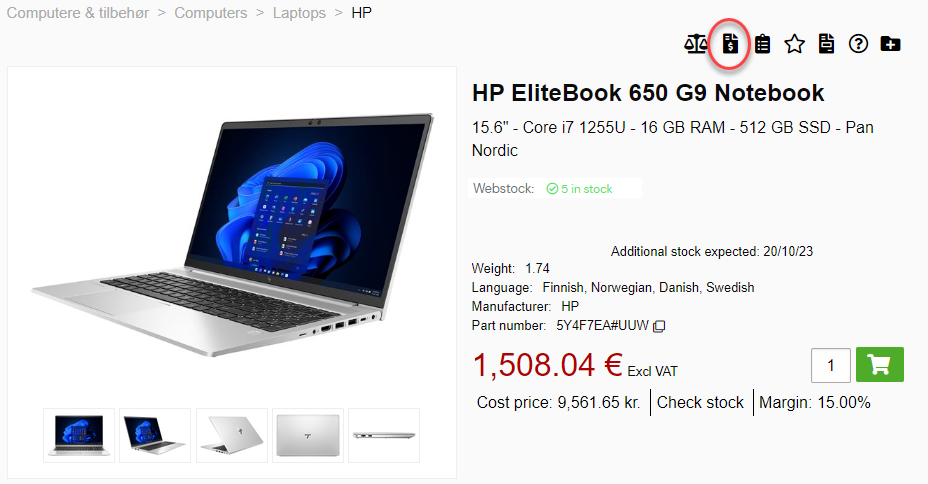
An asset can be created from a product by clicking the “Create asset” icon in the top right corner of the product card. The asset will be prefilled with the relevant data.
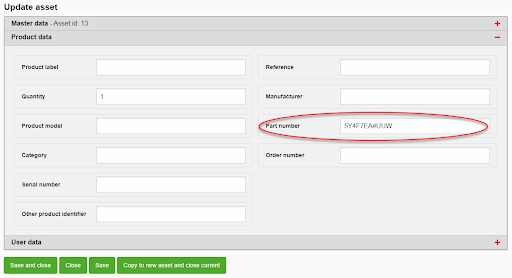
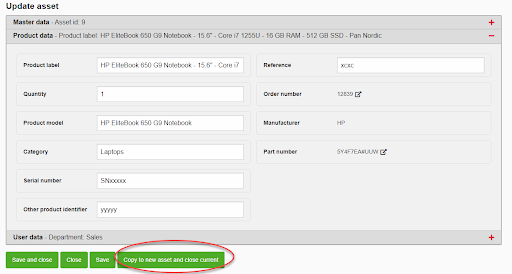
In the asset editor, the original product can be accessed by clicking the link in Product data -> Part number. And after that fill in the Master data and user data.
From order
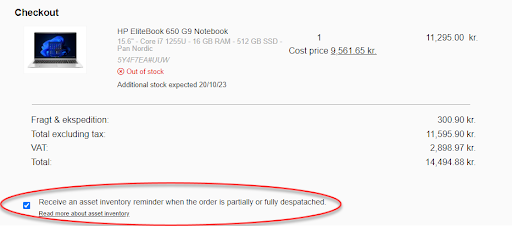
In checkout, the user can check the box “Receive an asset inventory reminder when the order is partially or fully delivered”, which means that a reminder will be sent to the user as a part of the delivery information. The mail contains a link to the order history and the user can add the product to the asset.
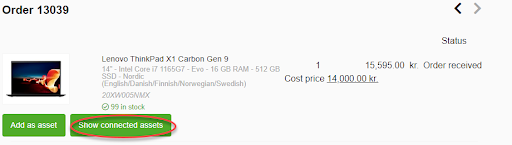
Or, the user can create an asset in order confirmation by clicking the “Add as asset” button. The asset will be prefilled with data in the different relevant fields.
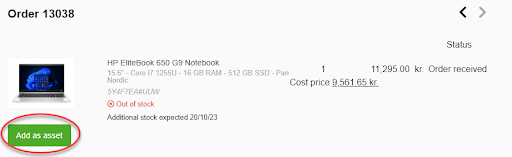
A list of connected assets can be accessed by clicking the “Show connected assets” button under the order item. In the asset editor, the original product (an asset created in the webshop or as an order item) and the order can be accessed by clicking the link in Product data -> Part number and Product data -> Order number, respectively.
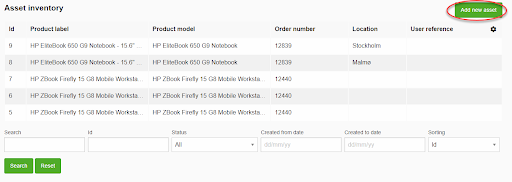
From the Asset inventory list
A blank asset can be created in the asset list, by clicking the “Add new asset” button. These assets will not have prefilled Product data. And will be needed to update the new asset with the necessary information manually.
From other assets
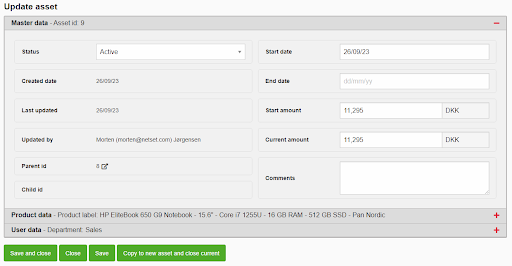
In the asset editor, an asset can be copied by clicking the “Copy to new asset and close current” button. This will set the current asset’s status to “Terminated/Moved” and create a new “child” asset.
You can navigate between these assets by clicking the links in Master data -> Parent ID and Master data -> Child ID.
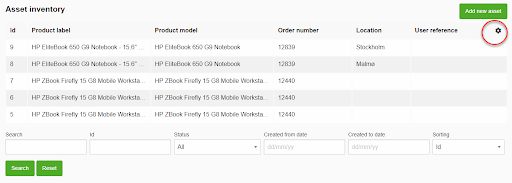
View assets
Opening the “Asset inventory” page will list all the customer’s assets. The displayed columns can be configured by clicking the cog icon in the top right corner.
Clicking the asset will take you to the editor page, where you can update or only view the asset depending on if you have update/read permissions.
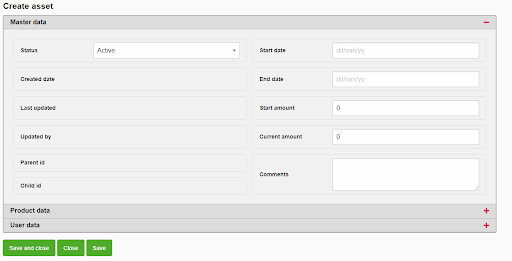
The first tab, Master Data, will display general information about the asset.
The second tab, Product Data, will display information about the connected product. These fields will be prefilled if the asset is created from a product or an order item.
The final tab, User Data, displays information about its user. The fields displayed can be configured in Settings -> Form editor -> Asset inventory configurator.
How to set up a mail reminder
Opt-in to receive reminder text
In the checkout, the customer can opt-in to receive a reminder text.
Setup mail templates
Depending on your mail template setup, a reminder that an asset can be created will be included in the following mail templates:
- se.netset.order.Order.statusPartDelivered
- se.netset.order.Order.statusDelivered
- Delivery Notification HTML template
When the order has the status of being partially delivered or fully delivered, the reminder text will be included in the mail.
For the mail to include the reminder text, it is important that {assetInventoryReminder} is added somewhere in the mail template bodies of the se.netset.order.Order.statusPartDelivered and/or se.netset.order.Order.statusDelivered.
If no custom changes have been made to the Delivery Notification HTML template, then it should work out of the box, otherwise, the template will need to handle the value of “AssetInventory/Reminder”. A tip is to take a look at the default template and see how “AssetInventory/Reminder” is used.
Setup “read more” link
The “read more” link is only shown when the “Asset inventory info link” setting has been configured. The setting can be found under Settings -> Miscellaneous -> Asset Inventory.
If you want to link to a page in the shop, perhaps a custom page, set the following:
cms/link-to-cms
If you want to link to another page, outside of the shop, make sure to include “https://” at the start. For example, giving the setting the value of https://www.netset.com will navigate the customer to the Netset site.