
Setting up your cookie banner
Here you can create, edit, and remove your store's cookie banner. This banner is only shown to users on their first visit to your store.
Click on the "Create" button to build your new banner, or click on a banner in the list to edit an existing banner.
Banner

Advanced Banner
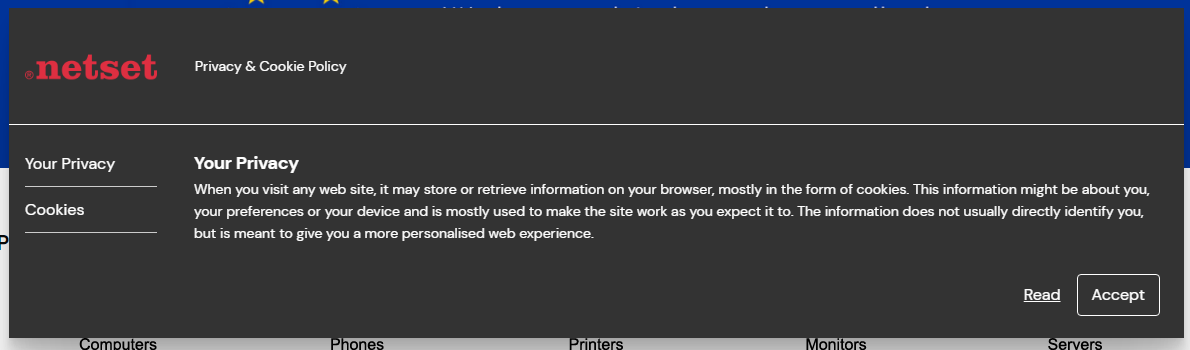
Banner Creation
| Feature | What it does |
|---|---|
| Name | This is where you add the name or label for this banner. You may create more than one, so this is your way of identifying a particular banner from your cookie banner list. |
| Active | This option either enabled or disabled this banner (you can create multiple banners but may only have one active at any one time). |
| Disable clicking the outside banner | When this option is selected, your user may not interact with any part of your shop except the banner. This forces your user to read and accept the content in the banner before being able to access your store. |
| Logo | This is where you may upload a log to your banner. |
| Position | You now have the option to position the banner inside the browser window. The three options available are:
|
| Acceptance text | Here you can label the accept button. example: Accept/Submit/OK etc. |
| Text | This field has two functions:
|
| Font colour | Use this tool to set the colour of the fonts. |
| Background colour | Use this tool to set the background colour of your banner. |
| Divider colour | Use this tool to specify the colour of content divider/splitters. |
Link
This is a link that when enabled will sit next to the accept button. This link is to display content that would otherwise be too long/detailed to sit inside the banner.
| Feature | What it does |
|---|---|
| Type | Gives you the option to create a link to a specified URL or link to a document you have previous created in the stores document editor. |
| Document/URL | Specify either a URL or select a pre created document (options depend on the selection you made on the previous setting). |
| Link name | Here you specify the link you want visible in the banner. Example: More info or Read more. |
| Open in a new window | When enabled this link will open in a new browser tab. If not the link will replace open in the current tab. |
Tab Creation (Advanced Banner)
You use this section to create tabs for additional contents or links. Click the "Create" button to create your first tab.
Type of section
Here you have two options:
- Text section
- URL section
Text Section
| Feature | What it does |
|---|---|
| Header | This will be the name/label of a tab that is created on the left hand side of the banner. |
| Text | This will be the text content that will be visible on the right hand side of the tab and will be visible then this tab is selected. |
| URL (check box) | Select this option if you want to add a URL link to this particular tab section. |
| URL | This is where you specify the URL the user is taken to once clicking the link. |
| Link name | This is the name/label of the link visible on the page. The URL above will be hidden behind this name/label. |
| Sorting | This is the sort order for this particular section amongst the other text or URL sections you have created. The lower the sort order the further up the banner this section will be presented. |
URL Section
| Link name | This is the name/label of the link visible on the page. The URL below will be hidden behind this name/label. |
| URL | This is where you specify the URL the user is taken to once clicking the link. |
| Sorting | This is the sort order for this particular section amongst the other text or URL sections you have created. The lower the sort order the further up the banner this section will be presented. |