Page History
| Info |
|---|
| This function will soon be EOL, we recommend you use custom pages instead. |
Nettailer contains an advanced a content management section. This is where your custom documents can be created. For example you're , Customer Services, Contact Us and About Us pages etc.
Once this link is clicked a new browser window will open. This window is divided into three sections.
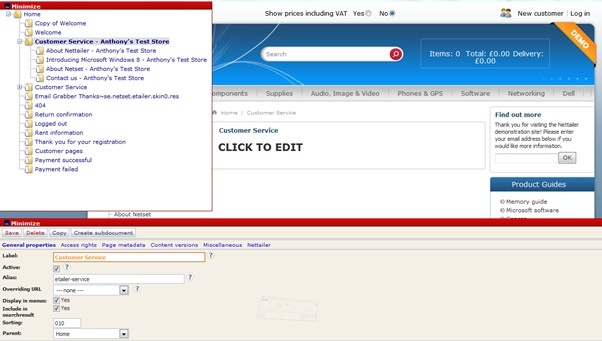
1, Top left is the navigation menu, where you can may add or select an existing document to edit or view. The
2, To the right is the preview window, giving you a look at your changes as you go along.
3, At the bottom is of the screen is the editing section, showing all this shows all the settings for the currently selected the selected part of the document you may be are working on.
Once you have created a document or selected an existing document in the navigation window, you may start to edit it by clicking on the element in the preview window and putting the information into the editing section (bottom window).
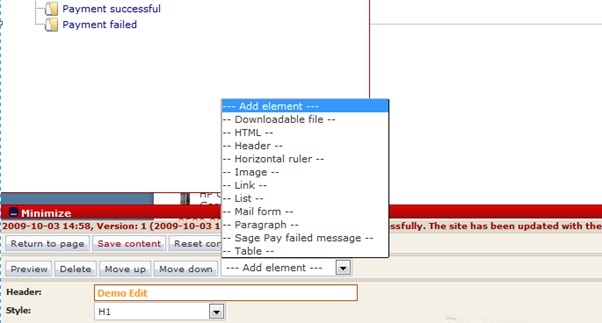
To add content to a page you must do so by adding the relevant "element" to a page. Here you can easily choose whether you want to , you will need to decide which element of content you want to add from the “elements” drop down menu. You can add a picture, paragraph, section, titleheading, link, download file and more. After the element is created you ...
Once you have selected the first element you are ready to add the content in the editing section.
Click the on "Preview" if you want to check the results before then to save it. Click "Save content" to save an element.
| Warning | ||
|---|---|---|
| ||
NOTE! It is important to Please remember to press the "Save content" when you made the changes that you want displayed in the shop. |
Lägg till element
Varje elementtyp innehåller ett antal tillval:
Bild
Du kan ladda upp valfri fil i jpg- png- eller gif-format. Du kan ange önskat mått. Om du endast anger ett värde för höjd eller bredd så skalas bilden proportionellt med automatik. Du kan även ange att bilden skall länkas till webbadress eller e-post.
Html
Med denna elementtyp kan du klistra in eller mata in html-kod för att på egen hand.
Horisontell linje
Detta val skapar en linje som du vid behov kan använda för att markera avdelning av stycken eller sektioner på sidan.
Lista
Denna elementtyp ger dig möjlighet att skapa punktlistor eller numrerade listor. Du kan enkelt lägga till rader och ändra sortering.
Nedladdningsbar fil
Detta element ger dig möjlighet att ladda upp filer som dina kunder skall kunna ladda ned, exempelvis en prislista eller inbjudan. Du kan välja om sidan skall visa en filtypens ikon. Detta sker med automatik och visar exempelvis en PDF-, Word- eller en Excel-ikon beroende på vilken filtyp du laddat upp.
Rubrik
Detta element används för att skapa rubriker. Du kan välja mellan sex olika stilar på din rubrik.
Stycke
Detta element används för att skapa stycken. Du kan i detta element använda normal, fetstil och kursiv stil.
OBS! I det fall som du vill kopiera text från din ordinarie ordbehandlare och klistra in den i shoppen så är det en fördel om du mellanlandar texten i exempelvis Notepad. Detta för att rensa texten från osynliga tecken eller annan data som adderats av ordbehandlaren.
Tabell
Med detta element kan du skapa enklare tabeller. Du kan lägga till och ta bort rader i tabellen med hjälp av "+"- och "-"-tecknen. Du kan ange om du vill att den första raden eller kolumnen skall vara rubrik/fetstil.
e-postformulär
Detta element tillåter dig att lägga till de färdiga e-postformulär du har skapat genom funktionen mailformulär.
...
“Save content” button once you have created pages or made any changes in the document section of Nettailer. |
...
Customized pages
To create a customer or client specific welcome page, you will need to create a new sub-document by clicking the button at the bottom left of the page.

Then click on the template for “Public Documents”. This creates a new page to be edited. Click on the "click me" and enter a title in the "heading". For example, "Welcome to the customer name's Shop"
If you want to add a new element on a page, click on an element in the preview image and add new items via the "drop-down" menu called "Add element". Here you can easily choose whether you want to add a picture, paragraph, section, title, link, download file and more.
After adding a few elements to the page and entering your content into them, you will have created your own page that may be added to the resource menu, linked from another area of your site or connected directly to a customer or customer group.
...
Adding elements
Each element contains a set of options:
Element | Element Function | |||||
|---|---|---|---|---|---|---|
Image | You can upload any file in jpg, png or gif format. You can specify the required measure. If you only specify a value for height or width so the image is scaled proportionally automatically. You can also specify the image to be linked to URL or an email. | |||||
HTML | With this element you can paste or insert html code in to the editor manually. | |||||
Horizontal line | This element creates a line that you might need to use to mark the division of paragraphs or sections of the page. | |||||
List | This element allows you to create bullet or numbered lists. You can easily add lines and change the type. | |||||
Downloadable file | This element allows you to upload files to your customers to download, for example, a price list or invitation. You can choose whether the page should display a file type icon. This is done automatically and displays such as a PDF, Word or Excel icon depending on the type of file you uploaded. | |||||
Header | This element is used to generate headers. You can choose from six different styles for your Header. | |||||
Paragraph | This element is used to create paragraphs of text or main content.
| |||||
Table | This element, you can create simple tables. You can add and delete rows in the table by using the "+" - and "-" characters. You can specify whether you want the first row or column to be the Header / bold. | |||||
e-mail form | This element allows you to add the finished e-mail form you have created by Mail forms editor. |